User Document

Welcome to the InstallShield Tuner 7.0 for Adobe Acrobat User Document. In addition to this user document, both the InstallShield® Tuner Help Library and the Windows® Installer (MSI) Help Library are included with Tuner as supplemental references. We recommended that you start with this user document, because Tuner has been customized specifically for Adobe Acrobat 7.0 products, and some features discussed in the supplemental pieces may not apply to this customized version.
Document overview
This document helps Information Technology (IT) managers customize Adobe Acrobat 7.0 product installers, along with some aspects of the Acrobat look and feel, prior to deployment. It describes how to prepare your machine for installing Tuner, how to install Tuner, and how to use Tuner to customize your Acrobat installer.
You can use Tuner to customize the installers for the following Adobe Acrobat 7.0 products:
- Adobe Acrobat 7.0 Professional
- Adobe Acrobat 7.0 Standard
- Adobe Acrobat Elements 7.0
- Adobe Reader® 7.0
Note: InstallShield Tuner 7.0 for Adobe Acrobat only functions with Acrobat 7.0 products. To customize the Adobe Acrobat 6.0 product installers, you must use InstallShield Tuner 6.0 for Adobe Acrobat. Adobe also has a similar tool available for Acrobat 5.x products called the Acrobat Enterprise Installation Tool (AEIT) 1.x. The Acrobat 5.x products include Adobe Acrobat 5.x, Adobe Acrobat Elements 1.x, and Adobe Acrobat Reader 5.0. For more information on Tuner 6.0 and AEIT 1, see www.adobe.com/products/acrobat/deployment.html .
To use Tuner, you must be familiar with installing applications in your environment as well as the installation and deployment strategies you will use. Additional information about using Tuner is available in the Tuner Help Library.
References
Both the InstallShield Tuner Help Library and the Windows® Installer v2.0 Help Library are included with this application as supplemental references. Because Tuner has been customized specifically for Adobe Acrobat 7.0 products, some features discussed in these references may not apply to this customized version.
For more information, see the following:
- InstallShield home page: www.installshield.com
- InstallShield Tuner home page: www.installshield.com/products/tuner
- Microsoft® Windows Installer: http://msdn.microsoft.com/library/default.asp?url=/library/en-us/msi/setup/about_windows_installer.asp
- Adobe Developer Resources site: http://partners.adobe.com/public/developer/main.html
- Adobe documentation about enterprise deployment: http://partners.adobe.com/public/developer/acrobat/index_advanced.html
- Acrobat IT Solutions website for the most current information on Adobe Acrobat products targeted to the IT professional: http://www.adobe.com/products/acrobat/deployment.html
Product overview
Tuner provides a graphical user interface to the Acrobat product installers that lets you make, save, and invoke modifications to the installer. These installer changes will run anytime, anywhere, throughout the enterprise, whether the installation is pulled from a server or pushed silently to users' desktops.
Features
You can use Tuner to customize Adobe Acrobat product installers in the following ways:
- Turn off auto-update and online registration, so users cannot independently update or register the application.
- Specify a silent installation, including pre-specifying the company name and serial number.
- Customize Distiller® prior to installing it, including adding and modifying job options files.
- Customize the Custom Setup options in the installer.
- Remove shortcuts from the desktop and the Start menu.
- Lock settings, so they cannot be altered by users.
- Customize Adobe PDF file printer settings.
- Predefine the online comments repository.
- Customize security settings for digital signature.
- Assign ownership of PDF file types on the desktop and in a browser.
- Edit each Adobe Acrobat application's registry and installer tables.
- Configure Adobe Acrobat to work with Adobe LifeCycle Policy Server.
- Suppress the End User License Agreement (EULA) during user-run setup.
- Disable users' ability to display PDF files in a browser.
- Customize file attachment handling within PDF files, including specifying which file types you want to block.
Tested tuner environments
Adobe has tested Tuner on Windows 2000 Professional (Service Pack 4) and Windows XP Professional (Service Pack 2). Adobe has also tested that the content output from Tuner is correctly recorded when Acrobat is installed on any of the supported Acrobat 7.0 Windows operating systems. (See System requirements for Adobe Acrobat 7.0 products.)
The Tuner user interface is in English. However, Adobe has tested the operation of Tuner in the following localized environments: English, French, German, and Japanese. Adobe has tested customizing a localized version of the application (for example, Adobe Acrobat 7.0 Professional Japanese) on a localized system (for example, Windows XP Professional Japanese), and then installing that application with modifications on a localized system (for example, Windows 2000 Professional Japanese).
System requirements for Adobe Acrobat 7.0 products
You can find the system requirements for Acrobat 7.0 products at the following locations:
Installing Tuner
To perform customizations, you install Tuner onto a computer containing a copy of the installation folder whose files you want to customize. You must copy all contents of this installation folder from the CD or installation share, including the Windows Installer, the Index Wizard Editor (ITW), and Setup.exe. When you run Tuner for the first time, it will prompt you to browse to these files.
To install Tuner:
- Download Tuner. It is available free from Adobe at www.adobe.com/products/acrobat/deployment.html .
- Copy the Acrobat 7.0 application's installation folder from the product CD onto the system where Tuner is installed. For example, some possible U.S. English CD installation folder paths include:
- D:/Adobe Acrobat 7.0 Professional
- D:/Adobe Acrobat 7.0 Standard
- D:/Adobe\Acrobat7.0\Acrobat Elements
Note: If you plan to set Acrobat security preferences by using Tuner, the Acrobat 7.0 product and Tuner must be installed on the same system. Change the security settings in Acrobat before setting the preferences in Tuner. (See Application configuration.)
- Unzip the Tuner download, and run the executable file to start the InstallShield Wizard.
- Click Next.
- For the destination folder, accept the default or click Change to select a different location. Then click Next.
- In the Ready To Install The Program dialog box, click Install.
- In the Wizard Complete dialog box, click Finish.
Preparing for customizing Adobe Reader 7.0 installers
The Adobe Reader 7.0 installer is available as a web installer at Adobe.com. It is a single installer that unpacks itself into the Windows cache during the installation of Adobe Reader. You can convert the web installer to a CD installer by using the following procedure.
To convert a web installer into a CD installer:
- Download the appropriate version of Adobe Reader 7.0 from www.adobe.com/products/acrobat/readstep2.html to the same system on which you installed Tuner.
- Start the web installer. The Netopsystems Fast Electronic Application Distribution (FEAD) Optimizer notifies you that it is processing.
- When the FEAD Optimizer finishes processing, the Adobe Reader 7.0 Setup window appears. Do not click Next.
- Navigate to the Adobe Reader 7.0 installation folder located in Program Files (for example: C:\Program Files\Adobe\Acrobat 7.0\Setup Files\RdrBig\xxx, where xxx is the three-letter language abbreviation (ENU = English, FRA = French, DEU = German, and JPN = Japanese)).
- Copy the entire contents of this folder into a new folder named, for example, "Adobe Reader 7.0."
Preparing for customizing Adobe Acrobat Elements 7.0 installers
Customizing the Adobe Acrobat Elements installer uses a slightly different process from customizing other Adobe Acrobat installers. Acrobat Elements requires two installers:
- Adobe Reader 7.0.msi, which installs Adobe Reader and must be run first
- Elements.msi, which installs Adobe Acrobat Elements
Note: If Adobe Reader 7.0 is already installed on the user's system, the Acrobat Elements installer will not reinstall it.
To prepare for customizing the Acrobat Elements installer, you must decide which installers you want to customize: Adobe Reader, Acrobat Elements, or both. You can customize either or both of the installers for these applications, depending on whether you want to customize the way users view PDF files (Adobe Reader) or the way PDF files are created (Acrobat Elements). Once you have customized the installers, you can then combine them into a single installation package.
Caution: If you include Adobe Reader and Acrobat Elements in a single package, you must ensure that Adobe Reader is installed before Acrobat Elements. Acrobat Elements can not be installed on any computer where an Adobe Reader installation is not already present. For information, see Initiating a project.
Using the Tuner interface
Tuner has three views that you can use together or separately. The right pane always displays dialog boxes or Help related to the item selected in the left pane.
Left pane
Lists the items that you can select to display in the right pane. When Tuner is first started, the left pane displays options for creating a new Microsoft transform (MST file) or selecting an existing transform. Once a transform is created, you can show or hide the Check List and View Bar using the menu and toolbar options.
Initiating a project
During a project, you select which Windows installer MSI file (also called a package) to use, and create a Microsoft transform (MST file) to be customized. The transform can have the same name and reside in the same location as the MSI file, or you can give it a different name and place it in another location. The transform must have the .mst file name extension.
To initiate a project:
- Choose Start > Programs > InstallShield Tuner 7.0 For Adobe Acrobat.
- In the Open dialog box, select the installation folder of the Acrobat 7.0 product you want to customize. Select the Index Wizard Editor file (.itw), and click Open.
- The InstallShield Tuner 7.0 for Adobe Acrobat Welcome pane is displayed by default. You can specify which pane you want displayed at startup under Open A Recent Transform.
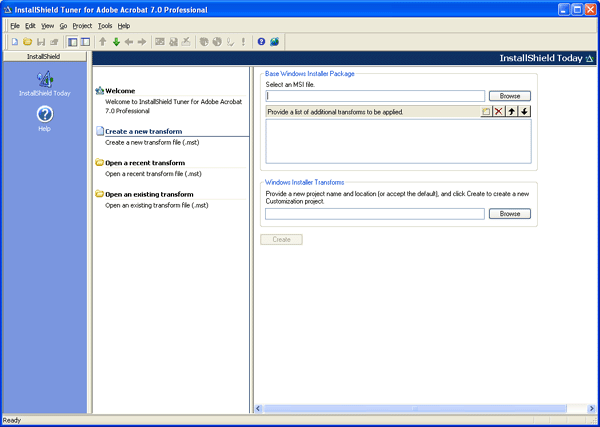
To create a new transform:
- Click Create A New Transform in the left pane.
- In the Base Windows Installer Package box in the right pane, type the path to the package you want to customize, or click Browse to locate the file.
- If you are using multiple transforms for this project, use the Provide A List Of Additional Transforms To Be Applied section. Click New and type the path, or click Browse to open the Select Additional Transforms dialog box. Use the Up Arrow and Down Arrow buttons to arrange the transforms in the order in which they should be applied.
Note: If you choose to use multiple transforms, note that the order in which the transforms are applied is important. For example, if Transform #1 creates a value for a property and Transform #2 modifies that value, applying Transform #2 before Transform #1 may result in an error.
- In the Windows Installer Transforms box, do one of the following:
- Accept the default name and location for the new project. The default uses the same location and name as the base installer file, appended with an .mst extension.
- Click Browse to select the location you want to use. Name the file by using an .mst extension, and click Save.
- Click Create. For more information, see Customizing a project.
- Save the new transform file before exiting Tuner.
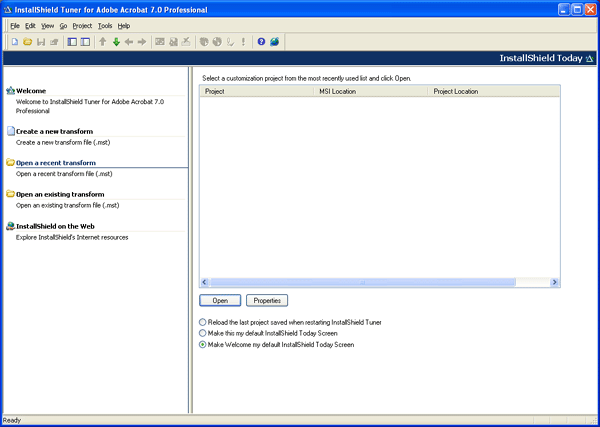
Opening a transform
You can display a list of transforms (MST files) that you have created for the project by choosing Open A Recent Transform. To display transforms that have been created by other users or reside on another computer, choose Open An Existing Transform.
Note: You can only create transforms for installation packages. Do not attempt to create transforms for individual application files. For information, see Preparing packages for distribution.
To open a recent transform:
- Click Open A Recent Transform in the left pane.
- Select a project.
- (Optional) Click Properties to display details about the selected customization project, including file locations, size, dates, and related transforms.
- Select the options at the bottom of the pane to set Tuner behavior at startup.
- Click Open.
Customizing the Acrobat Elements installer
Customizing the Adobe Acrobat Elements installer involves customizing one or both of the following two installers:
- Adobe Reader 7.0.msi, which installs Adobe Acrobat Reader, and must be run first
- Elements.msi, which installs Adobe Acrobat Elements
Note: You can only create transforms for installation packages. Do not attempt to create transforms for individual application files. For information, see Preparing packages for distribution.
To customize the Acrobat Elements installer:
- Copy the Adobe Reader installation folder from the Acrobat Elements CD onto the system where you will run Tuner.
- Customize the Adobe Reader installer as needed. For more information, see Initiating a project.
- Copy the Acrobat Elements installation folder from the Acrobat Elements CD onto the system where you will run Tuner.
- Customize the Acrobat Elements installer as needed. For more information, see Initiating a project.
- Deploy both installers, either separately or in a single package, making sure that Adobe Reader is always installed before Acrobat Elements.
Customizing a project
After you have created a project, the left pane displays the Check List. To customize a project, you work through the steps of the Check List, save the new transform, and then create a package to prepare the transform for deployment. When you click a Check List item, the right pane displays additional information about the item and customization options. Some items also display Help in the lower portion of the pane, such as information on choices and menu options.
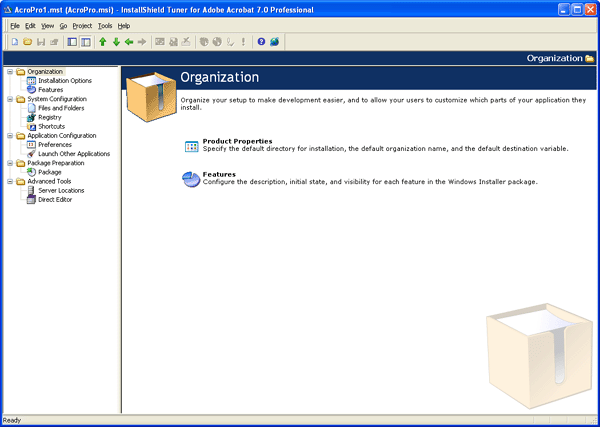
Organization
Organization specifies default properties and configures features in the Windows Installer package.
Installation Options
Use this pane to configure the following information:
- Specify the organization name, user name, product serial number, and default installation path for the Adobe application whose installer you are customizing.
Note: If you want to deploy the installer in silent mode, you must specify the user name and serial number.
- Specify whether to enable or disable certain behaviors of the installed application on users' computers: whether Adobe Acrobat will be the default PDF document viewer, whether to remove previous Adobe Acrobat versions, whether to run the optimization (defragmentation) utility, and whether installer files will be cached on the local hard disk.
- For multilanguage installers, specify whether you want users to choose the language they install. If you do not, select the installation language from the list.
System configuration
System Configuration sets up the target systems with files and shortcuts required by your application.
Files and Folders
Use this pane for adding or removing files or folders from the installation. Drag the item you want to add from the source computer's folder tree to the destination computer's folders. To remove an item, right-click the item, and select Remove.
Note: Removing a file only deletes the data table entry so that the item is not installed. The .cab file remains unchanged. Adding files creates additional .cab files.
Registry
You can use this pane to modify the ways that Adobe Acrobat products write information to the registries of computers where they are installed.
Caution: Adobe strongly recommends that you do not make changes on the Registry pane unless you are knowledgeable about editing and troubleshooting Microsoft Windows registry settings. Improper use of this feature can result in the corruption of critical system files.
Application configuration
Application Configuration predefines settings and user information, and can run other applications as part of your Acrobat deployment.
Preferences
Use this pane for modifying and locking certain settings for the Acrobat user interface so that they cannot be changed once the application is installed. These settings are the same selections as those that are available within Distiller and Acrobat. For more information on these settings, see Help for the Acrobat 7.0 products and Distiller 7.0.
- Distiller: Both default and custom job options file names appear in the Adobe PDF Settings Files list. Add and remove job options files until the list contains the files you want available after installation. The Select Default Adobe PDF Settings File menu lets you select which file to use as the default after installation.
- Adobe PDF Printer: Specifies printer output and behavior, including the default PDF output folder, the default level of security for each job, font and PostScript® printing options, viewing options, and replacing the PostScript Printer Description (PPD) file.
- Security: Sets preferences for security and digital signatures. To set certain security preferences, you must have Acrobat 7.0 and Tuner installed on the same machine. Before using this tab, you must open Acrobat 7.0 and set the security options by selecting Edit > Preferences > Digital Signature. After setting the options, exit Acrobat. Then, in Tuner, you can use the Set command to import your Acrobat 7.0 settings. You can also set up Identity Search Directories and Trusted Identities in the same way by first making the changes in Acrobat under Advanced > Manage Digital IDs. The Reset Settings command restores the values in Security Settings to the default, which is None. In the Signature Details pane, you can modify and lock down the Reasons for Signing list, control whether digital signatures are verified or not upon document open, and control whether users can create invisible signatures.
- Policy Server: Lists the Adobe LifeCycle Policy Servers that users can access in your environment, and permits or denies users' control over this list.
- EULA and Online Features: Lets you suppress the display of the End User License Agreement (EULA) during user-run setup of the Adobe Acrobat products whose installers you are customizing. You can also enable or disable various online features (updates, toolbar message display, online registration, browser-based PDF display, Digital Editions features, and PrintMe Internet Printing). When you disable any online feature, the feature is displayed as unavailable (dimmed) in the user's installed application.
- Comments and Forms: Designates a specific server location and settings for an online comments repository, and lets you establish the level of control available to users for the form's auto-complete feature.
- File Attachments: Lets you control whether Adobe Acrobat will automatically start other applications when users open attachments from within a PDF file. You can control this behavior on a per-file extension basis. For each file extension, you can specify whether to permit or prohibit opening attachments that have that extension, or you can select Unspecified and specify the default action that Adobe Acrobat will take.
Launch Other Applications
Lets you run executable and batch files, set command-line parameters, and specify the Windows operating systems on which the installation will run. Items are started in the order listed, so it is important to ensure that one action does not undo another (unless you specifically intend this behavior).
Preparing packages for distribution
In the Package pane, you can choose one of the package options to create and distribute the customized installation. There are three package options available. You can also use the Packaging Wizard. (See Packaging Wizard.)
Location
To deploy your installation package over a network server or by using an FTP site, specify the network path or FTP site here.
Note: To create a new folder when specifying the network location, you must type it manually. The folder will be created during packaging.
Setup
You can combine the transform and package in a single executable file named Setup.exe. This is the method recommended for installing locally.
SMS
Use to designate the version of Microsoft Systems Management Server (SMS). Adobe has fully tested SMS version 2003 with Service Pack 1 for use with Tuner.
To deploy a setup package with a third-party software deployment tool:
Instead of using the Setup option, it is recommended that you apply the transforms by using either Msiexec.exe or Setup.exe and the transform command-line arguments. For example:
setup.exe /v "TRANSFORMS=\"%SOURCEDIR%transform1.mst;%SOURCEDIR%transform2.mst""
where %SOURCEDIR% is the full path to the transform files.
msiexec.exe /i "%PACKAGEPATH%\AcroPro.msi"
TRANSFORMS="%SOURCEDIR%transform1.mst;%SOURCEDIR%transform2.mst"
Note: You may want to use double quotation marks if the path name or the transform file name includes a space.
Additional tools
Server Location
Lets you specify additional server locations for the Windows Installer package for Acrobat 7.0 products, including Acrobat Elements, Professional, and Standard. You may want to copy the installer to a server in case a user needs to run a detect-and-repair process. Unless you have specified that installation files will be cached on the local machine, Acrobat will look for it in the specified server location. Also, Acrobat 7.0 can cache the installer locally on a user's computer, enabling patching and repair processes to refer to the local cached version.
Additional server locations are not necessary for Adobe Reader 7.0, because the installer is cached on the local drive at the following default location: C:\Program Files\Adobe\Acrobat 7.0\Setup Files\Rdryyy\xxx, where xxx is the three-letter language abbreviation (ENU = English, FRA = French, DEU = German, and JPN = Japanese) and yyy is either BIG (ReaderBig) or MIN (ReaderMin).
Direct Editor
Lets you edit the installation tables of the Adobe Acrobat application you are customizing.
Caution: Adobe strongly recommends that you do not use the Direct Editor feature unless you are knowledgeable about editing and troubleshooting installer tables. Improper use of this feature can result in the corruption of critical system files.
Packaging a project
Tuner collects the files you want to use for your package distribution over a network location or FTP server, creates a Setup.exe file with command-line arguments, or configures distribution with Microsoft SMS. You can do this with the Package Check List item, or with the Packaging Wizard.
Note: If the Package and Packaging Wizard menu options are dimmed, make sure that you saved the transform file. These options are not available until the transform file is saved. To save the transform, select File > Save.
Packaging Wizard
Once you have created your transform file, you can select the Packaging Wizard from the Project menu to complete the creation of the package. The Packaging Wizard displays three separate dialog boxes that correlate to those in the Package pane. You select the packaging options that you want and provide the necessary information, and the Packaging Wizard completes the process.
Silent installation
The installation package can run in silent mode with the /qn command-line argument. You can specify this command line in the Package Setup pane in the Windows Installer Command Line Arguments box. The /qn argument can also be set outside of Tuner by specifying /qn as your command-line argument when running Msiexec.exe or by specifying /v /qn when running Setup.exe.
For either option, specify the serial number within the Installation Options pane (see Organization). A silent installation will fail if the serial number has not been specified. (This step is not required when customizing the Adobe Reader installer, because Adobe Reader does not require a serial number.)
Note: If you are running Setup.exe, you may want to add an additional "/s" argument to suppress the initial installation dialog box. For example:
Deploying a project
For more information on Adobe's support of Acrobat with software deployment tools, please see www.adobe.com/products/acrobat/deployment.html .
Troubleshooting tips
- Do not try to run an installation package (MSI file) from CD. Copy it to your hard disk first.
- After opening an Index Wizard Editor file (ITW) for a specific Acrobat product, you can only open packages and transforms for that specific Acrobat product. If you want to work with packages or transforms for a different product, you must open the ITW file for that product first.
- If you are running Msiexec.exe, make sure that you specify TRANSFORMS="path to the transform file". If you are applying more than one transform, you must separate the transform file paths with semi-colons. For example:
msiexec.exe /i Acrobatinstallerpackage.msi TRANSFORMS="c:\\ProgramFiles\MyTransform1.mst; c:\Program Files\My Transform2.mst".
- If you are running Setup.exe and have selected the Setup.exe option under Package > Setup, the Package > Setup option automatically captures the correct transform file information and writes it to the Setup.ini file. The package does not capture the whole path to the transform and assumes you are running the installer locally.
Copyright 2005 Adobe Systems Incorporated. All rights reserved.
NOTICE: All information contained herein is the property of Adobe Systems Incorporated. No part of this publication (whether in hardcopy or electronic form) may be reproduced or transmitted, in any form or by any means, electronic, mechanical, photocopying, recording, or otherwise, without the prior written consent of the Adobe Systems Incorporated.
PostScript is a registered trademark of Adobe Systems Incorporated. All instances of the name PostScript in the text are references to the PostScript language as defined by Adobe Systems Incorporated unless otherwise stated. The name PostScript also is used as a product trademark for Adobe Systems implementation of the PostScript language interpreter.
Adobe, the Adobe logo, Acrobat, the Acrobat logo, Acrobat Distiller, PostScript, the PostScript logo and Adobe Reader are either registered trademarks or trademarks of Adobe Systems Incorporated in the United States and/or other countries.
Microsoft and Windows are either registered trademarks or trademarks of Microsoft Corporation in the United States and/or other countries. All other trademarks are the property of their respective owners.
This publication and the information herein is furnished AS IS, is subject to change without notice, and should not be construed as a commitment by Adobe Systems Incorporated. Adobe Systems Incorporated assumes no responsibility or liability for any errors or inaccuracies, makes no warranty of any kind (express, implied, or statutory) with respect to this publication, and expressly disclaims any and all warranties of merchantability, fitness for particular purposes, and noninfringement of third party rights.